The first part of this “series” can be found here, which tells about prepping the piece before you get to the messy-fun stuff.
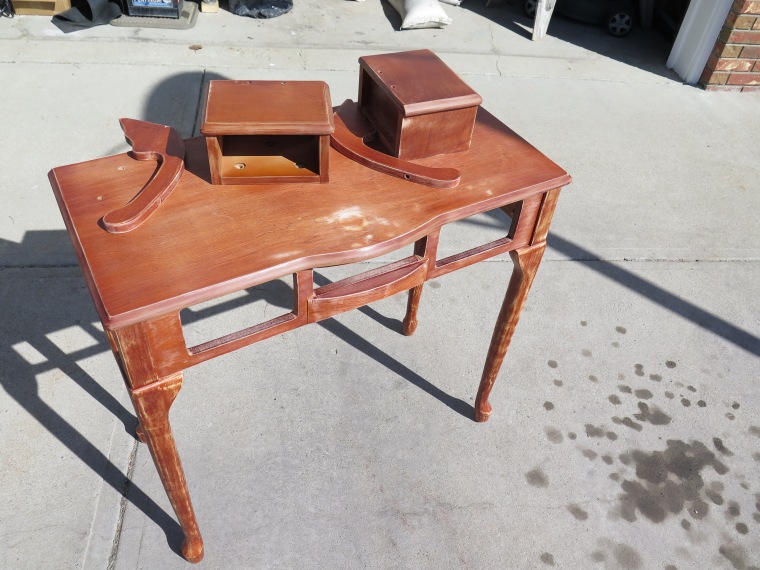
I rescued this pretty little dressing table out of an alleyway near my house. This was over a month or so ago and I had been working on refinishing it for what felt like forever. It looked like the teenage girl that had it, was messier with makeup than a bull in a china shop. The table top surface was scratched and scarred and it looked to me like it needed a little loving attention. Or rather a lot by the time I was finished with it. I gave it a complete made for TV makeover.


There are a few important things you will need for this next part of the project. First is your stain, you could use anything, but for the purpose here I’m using Minwax Polyshades. It’s a one step process; no stripping, or priming or any funky extra stuff. You’ll also absolutely need a natural bristle brush. This is important because it won’t react with anything in the stain. I tried using a polyester brush at first and it made everything look streaky and not so fabulous. I paid three bucks for my brushes from Walmart.
You’ll also need steel wool, and any kind of paint thinner; also some gloves and a drop cloth if you are really being cautious. I just used a big old box that was laying around to catch any spills or stray drips.
The paint thinner is for cleaning brushes and fixing mistakes. It is the only thing that will remove oil based paint or stain and as long as you don’t let the brush dry out in between coats, you shouldn’t need more than one paintbrush if you use thinner every time you’re done for the day. Of course you could also buy 6 brushes and forgo the thinner by throwing each one out when you’re done a coat.
As I said, you can also use paint thinner to wipe away the stain if you notice it dribbles or drips anywhere. As long as you catch it while its still wet, or still tacky at the very least, you can take a rag with some paint thinner on it and wipe the mistakes away.
One key thing about working with this stuff is to lay the portion you’re working on perfectly flat so that it settles properly. It has a bit of a strange consistency, so when you first brush it on, it will look streaky and kind of bad but as it sits it smoothes out. If it is put on remotely too thick or you try to paint in any direction other than horizontally flat, it will drip. Trust me. Even if you think it’s cured, leave it laying flat until it completely dries. I left each area to dry over night as I was working. I found this the best way to do it because if I tried to do too much or If I got impatient or greedy, it would inevitably trickle down or do something equally annoying.
As with many projects like this, patience is the ultimate key.
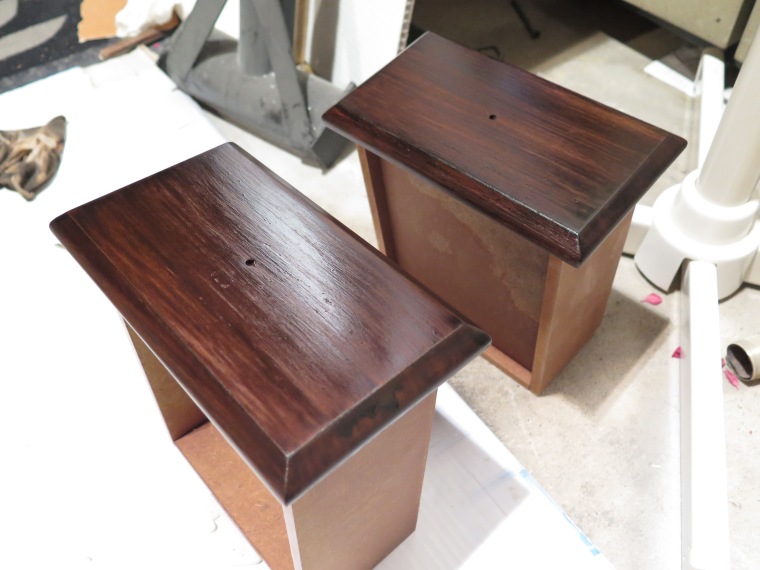
The photo above shows the very first thing I painted. The drawers turned out really nicely here and I would have liked to just do one coat but as I moved along, it became apparent that that wasn’t going to fly. I ended up doing two if not three coats on almost everything.
In between each coat you want to let it dry overnight and scrub it down with the steel wool before the next layer. This will scratch it up just enough to give the next layer something to cling to.

Two things I will mention now. First, you can see in the lower center of the picture of the drawers above, that there are some of those darn drips I was talking about earlier. You have to be so careful to make every stroke lightly and evenly, so that there are no globs anywhere. Globs are bound to turn to drips. What I ended up doing with these edges (where it was impossible to lay them flat) was I used the painters tape and lightly stuck it along the upper edge on the front face of the drawer so that I could add a third coat to each edge. This prevented any scuffing with the paintbrush bristles on the nice clean drawer front. I also did this with the table top and in a few other areas. With the espresso shade I chose, these three coats turned the edges jet black (which I didn’t mind in the end) but it’s up to you. I’m not sure how any other Minwax shade would behave.
The second thing I will mention is that I’d recommend working as fast as you can without making too many mistakes. It tends to smooth out better if you work quickly. I don’t exactly know the science behind it but it helped me get a nicer finish when I was conscious to be fast.
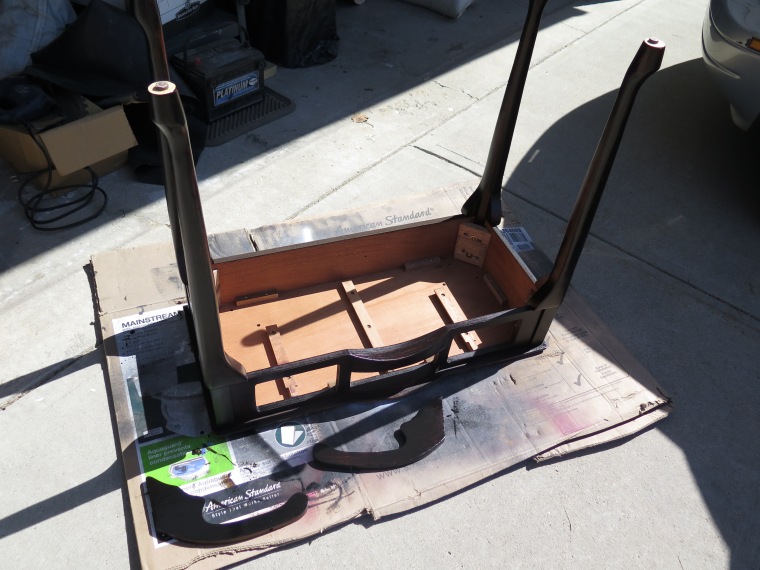
 The only areas that didn’t fit the horizontal-flat rule here, were the tables legs. I didn’t want to detach them from the bulk of the table because I figured it would be a hassle to work out how to paint all the way around them in any other position. I left them screwed on and worked really fast on each one individually working from bottom to top. This way I would avoid impatient smears and cursing. Again you have to have really big long strokes here, and keep the stain in thinner coats to avoid the dreaded drips.
I would also say that its easier to paint larger areas if you keep the edges of wherever you paint wet. That means work from bottom up, one side to the other, in horizontal strips, whatever works best, just make sure that you don’t paint in patches because you will end up with unevenness and streaky bits where it partially dries in between strokes.
Below you can see how I positioned the table as I painted her legs. This way any drips were going to go vertically anyways and as I said I worked really fast and by the time I was done I had two coats on each leg. The legs probably turned out the best out of the whole project even though I was most nervous to do them.
I think I’m making this stuff out to be really complicated and unforgiving but honestly it could be worse, with many other products out there it gets complicated pretty quick. Refinishing furniture with stain or lacquer isn’t easy. It takes work and I wouldn’t call it a “one afternoon” kind of job. If you want that kind of a project I would look at spray-paint or regular brush/roller paint. It’s much more forgiving, yet the flat-horizontal rule would still apply there as well.


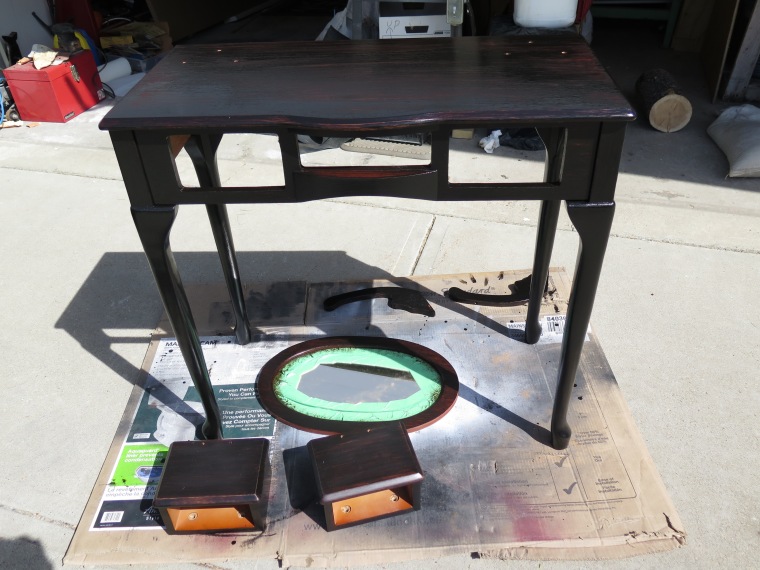
The next step was the mirror, this was tricky. Because it is round, I couldn’t tape off any of the edges other than to cover the glass. To work around that, I did it in three stages. The inside edge got two coats first, then the front of the frame got one coat. Next I balanced it on some water glasses to give the outside edges their two coats. Lastly, I painted the front of the frame with it’s second coat and did some touch ups. I left the second coat on the front for the end so that any mess ups or smudges from the other two parts would be covered up. I wanted that area to look flawless because it is what everybody looks at.
T he biggest task of all was the table top. It is the largest area and it is where I learned the paint-systematically-tip the hard way. I began it’s first coat by painting in patches, kind of from the center outward. This was a mistake because as you can see from the image on the right, it came out super patchy. It looked really bad and streaky.
It doesn’t look so bad from far away (below) but if you were to look any closer you would definitely have noticed it, even with two coats. That picture was taken just before I left everything for three weeks while I got mad at myself for being impatient.
Another little tip is don’t paint outside unless there is absolutely no wind. Little particles of dust and crud will get in this stuff and it will also look really bad. You almost need perfectly optimum conditions to make it look any good at all haha.
At this point I was so frustrated because it was streaky and speckled with all kinds of wind crud and nothing was working properly. To be honest, at one point I was so mad at myself that I was scared I’d have to pull out the power sander and start from scratch. Eventually I had a brilliant idea as I was scrubbing away some annoying little drips (Or at least I think it was a good idea, some refinisher out there will be rolling their eyes and pulling their hair).
So, what I noticed was that I actually liked how the scrubbed stain looked. It seemed like it would be better for the table top anyways, I wouldn’t have to worry so much about scratching my paint job because it would already be scratched up. This way it would hide a little bit of the daily wear and tear without slapping a big piece of glass on top to protect everything. So I got to work and scrubbed my butt off. I left the legs and the edges of everything as it was and scrubbed the table top, the front of the mirror frame, the drawer fronts, and the top surfaces of the cubbies so that everything kind of matched.
I was pretty proud of my ingenuity to make a bad problem workable. Scrubbing really did the trick to even everything out and make it look intentional. It kind of just looks like a really matte finish now.
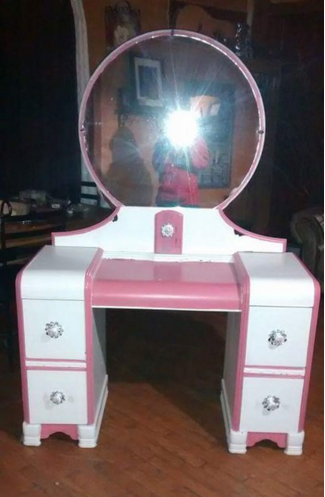
Below you can see the completely finished product. I shined up the original brass pulls and put her all back together and she looked like a brand new piece of furniture! The only thing I am still pondering over is what to do with the insides of the cubbies. I didn’t want to paint them with the stain because I thought it would be a nightmare and a half, so I’ve just left it for now. I’ve been thinking about covering them with contact paper in a nice pattern or maybe painting them a solid bright colour. Who knows but for now I tucked these two pretty little silver dishes in them jazz it up a bit.
All in all it was a heap of work but I certainly think it was worth it. I love how it turned out and I’m pretty proud of my determination. I intend to eventually use it as an entryway table in my home so we can tuck our keys away in the drawers and I can primp my hair before I run out the door.
This was certainly a long one, but as far as I’m concerned the information is valuable for the amateur furniture refinisher.
Happy refinishing! I’d love to see anyone else’s projects!


 I rescued this pretty little dressing table out of an alleyway near my house. This was over a month or so ago and I had been working on refinishing it for what felt like forever. It looked like the teenage girl that had it was messier with makeup than a bull in a china shop. The table top surface was scratched and scarred and it looked to me like it needed a little loving attention. Or rather a lot by the time I was finished with it. I gave it a complete made for TV makeover.
 First off I have to address something that was a huge struggle. The type of paintbrush. I don’t know why, maybe because this product is oil based, but you need to use a natural bristle brush. It can’t be made of anything synthetic because for some reason it reacts to the product and it will not produce the nice smooth texture we’re looking for. It just looks kinda bad.