Part two: The Paint

The first part of this “series” can be found here, which tells about prepping the piece before you get to the messy-fun stuff.

I rescued this pretty little dressing table out of an alleyway near my house. This was over a month or so ago and I had been working on refinishing it for what felt like forever. It looked like the teenage girl that had it, was messier with makeup than a bull in a china shop. The table top surface was scratched and scarred and it looked to me like it needed a little loving attention. Or rather a lot by the time I was finished with it. I gave it a complete made for TV makeover.

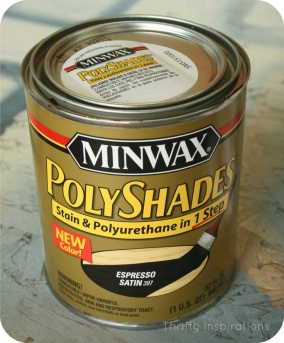
There are a few important things you will need for this next part of the project. First is your stain, you could use anything, but for the purpose here I’m using Minwax Polyshades. It’s a one step process; no stripping, or priming or any funky extra stuff. You’ll also absolutely need a natural bristle brush. This is important because it won’t react with anything in the stain. I tried using a polyester brush at first and it made everything look streaky and not so fabulous. I paid three bucks for my brushes from Walmart.

You’ll also need steel wool, and any kind of paint thinner; also some gloves and a drop cloth if you are really being cautious. I just used a big old box that was laying around to catch any spills or stray drips.

The paint thinner is for cleaning brushes and fixing mistakes. It is the only thing that will remove oil based paint or stain and as long as you don’t let the brush dry out in between coats, you shouldn’t need more than one paintbrush if you use thinner every time you’re done for the day. Of course you could also buy 6 brushes and forgo the thinner by throwing each one out when you’re done a coat.

As I said, you can also use paint thinner to wipe away the stain if you notice it dribbles or drips anywhere. As long as you catch it while its still wet, or still tacky at the very least, you can take a rag with some paint thinner on it and wipe the mistakes away.

One key thing about working with this stuff is to lay the portion you’re working on perfectly flat so that it settles properly. It has a bit of a strange consistency, so when you first brush it on, it will look streaky and kind of bad but as it sits it smoothes out. If it is put on remotely too thick or you try to paint in any direction other than horizontally flat, it will drip. Trust me. Even if you think it’s cured, leave it laying flat until it completely dries. I left each area to dry over night as I was working. I found this the best way to do it because if I tried to do too much or If I got impatient or greedy, it would inevitably trickle down or do something equally annoying.

As with many projects like this, patience is the ultimate key.

IMG_2521

The photo above shows the very first thing I painted. The drawers turned out really nicely here and I would have liked to just do one coat but as I moved along, it became apparent that that wasn’t going to fly. I ended up doing two if not three coats on almost everything.

In between each coat you want to let it dry overnight and scrub it down with the steel wool before the next layer. This will scratch it up just enough to give the next layer something to cling to.

IMG_2563
This was coat number one on the cubbies, I ended up with two coats by the time I was done these. I also used the painters tape method on the edges.

Two things I will mention now. First, you can see in the lower center of the picture of the drawers above, that there are some of those darn drips I was talking about earlier. You have to be so careful to make every stroke lightly and evenly, so that there are no globs anywhere. Globs are bound to turn to drips. What I ended up doing with these edges (where it was impossible to lay them flat) was I used the painters tape and lightly stuck it along the upper edge on the front face of the drawer so that I could add a third coat to each edge. This prevented any scuffing with the paintbrush bristles on the nice clean drawer front. I also did this with the table top and in a few other areas. With the espresso shade I chose, these three coats turned the edges jet black (which I didn’t mind in the end) but it’s up to you. I’m not sure how any other Minwax shade would behave.

The second thing I will mention is that I’d recommend working as fast as you can without making too many mistakes. It tends to smooth out better if you work quickly. I don’t exactly know the science behind it but it helped me get a nicer finish when I was conscious to be fast.

IMG_2565The only areas that didn’t fit the horizontal-flat rule here, were the tables legs. I didn’t want to detach them from the bulk of the table because I figured it would be a hassle to work out how to paint all the way around them in any other position. I left them screwed on and worked really fast on each one individually working from bottom to top. This way I would avoid impatient smears and cursing. Again you have to have really big long strokes here, and keep the stain in thinner coats to avoid the dreaded drips.


I would also say that its easier to paint larger areas if you keep the edges of wherever you paint wet. That means work from bottom up, one side to the other, in horizontal strips, whatever works best, just make sure that you don’t paint in patches because you will end up with unevenness and streaky bits where it partially dries in between strokes.

Below you can see how I positioned the table as I painted her legs. This way any drips were going to go vertically anyways and as I said I worked really fast and by the time I was done I had two coats on each leg. The legs probably turned out the best out of the whole project even though I was most nervous to do them.

IMG_2562
Those strange little wobbly shapes are the mirror supports, I think they got three coats in the end and I did them similarly to the mirror which I mention a little further on.

I think I’m making this stuff out to be really complicated and unforgiving but honestly it could be worse, with many other products out there it gets complicated pretty quick. Refinishing furniture with stain or lacquer isn’t easy. It takes work and I wouldn’t call it a “one afternoon” kind of job. If you want that kind of a project I would look at spray-paint or regular brush/roller paint. It’s much more forgiving, yet the flat-horizontal rule would still apply there as well.

The next step was the mirror, this was tricky. Because it is round, I couldn’t tape off any of the edges other than to cover the glass. To work around that, I did it in three stages. The inside edge got two coats first, then the front of the frame got one coat. Next I balanced it on some water glasses to give the outside edges their two coats. Lastly, I painted the front of the frame with it’s second coat and did some touch ups. I left the second coat on the front for the end so that any mess ups or smudges from the other two parts would be covered up. I wanted that area to look flawless because it is what everybody looks at.

TIMG_2567he biggest task of all was the table top. It is the largest area and it is where I learned the paint-systematically-tip the hard way. I began it’s first coat by painting in patches, kind of from the center outward. This was a mistake because as you can see from the image on the right, it came out super patchy. It looked really bad and streaky.

It doesn’t look so bad from far away (below) but if you were to look any closer you would definitely have noticed it, even with two coats. That picture was taken just before I left everything for three weeks while I got mad at myself for being impatient.

Another little tip is don’t paint outside unless there is absolutely no wind. Little particles of dust and crud will get in this stuff and it will also look really bad. You almost need perfectly optimum conditions to make it look any good at all haha.

IMG_2564

At this point I was so frustrated because it was streaky and speckled with all kinds of wind crud and nothing was working properly. To be honest, at one point I was so mad at myself that I was scared I’d have to pull out the power sander and start from scratch. Eventually I had a brilliant idea as I was scrubbing away some annoying little drips (Or at least I think it was a good idea, some refinisher out there will be rolling their eyes and pulling their hair).

So, what I noticed was that I actually liked how the scrubbed stain looked. It seemed like it would be better for the table top anyways, I wouldn’t have to worry so much about scratching my paint job because it would already be scratched up. This way it would hide a little bit of the daily wear and tear without slapping a big piece of glass on top to protect everything. So I got to work and scrubbed my butt off. I left the legs and the edges of everything as it was and scrubbed the table top, the front of the mirror frame, the drawer fronts, and the top surfaces of the cubbies so that everything kind of matched.

I was pretty proud of my ingenuity to make a bad problem workable. Scrubbing really did the trick to even everything out and make it look intentional. It kind of just looks like a really matte finish now.


Below you can see the completely finished product. I shined up the original brass pulls and put her all back together and she looked like a brand new piece of furniture! The only thing I am still pondering over is what to do with the insides of the cubbies. I didn’t want to paint them with the stain because I thought it would be a nightmare and a half, so I’ve just left it for now. I’ve been thinking about covering them with contact paper in a nice pattern or maybe painting them a solid bright colour. Who knows but for now I tucked these two pretty little silver dishes in them jazz it up a bit.

All in all it was a heap of work but I certainly think it was worth it. I love how it turned out and I’m pretty proud of my determination. I intend to eventually use it as an entryway table in my home so we can tuck our keys away in the drawers and I can primp my hair before I run out the door.

This was certainly a long one, but as far as I’m concerned the information is valuable for the amateur furniture refinisher.

Happy refinishing! I’d love to see anyone else’s projects!

Part one: The Prep

12969194_10154155510853336_1537254210_nI rescued this pretty little dressing table out of an alleyway near my house. This was over a month or so ago and I had been working on refinishing it for what felt like forever. It looked like the teenage girl that had it was messier with makeup than a bull in a china shop. The table top surface was scratched and scarred and it looked to me like it needed a little loving attention. Or rather a lot by the time I was finished with it. I gave it a complete made for TV makeover.
The little picture to the left is the only one I have of how it looked originally. I had already begun to sand the top surface by that point, which was the main damage area. I was intending to just paint that part at first, but I ended up going a whole lot further.

This thing evolved a few times since that point.

polyshades

As you can see, it was a rich reddish cherry colour and…while it was nice, It really wasn’t my style at all. I would have struggled and fought to match it with anything I own.

So I went to Home Hardware to look at staining and painting options. Eventually I settled on the 1 Step Minwax PolyShades. Being somewhat of a novice “refinisher” I wanted to try and make it as painless as possible…which didn’t end up working very well but I think any other product would have been ten times worse. This thing is pretty cheap too, I think I paid 10 dollars for it and I got the smaller can because I figured it would be just enough to get me through. If you’re doing a bigger project you’ll need the big can though because I just skimmed by with this. The colour I chose is the Espresso Satin finish. I had to go darker so that it would cover all that cherry-ness and I liked this rich brownish black so I dived right in and decided to go all the way with this thing. I think it was definitely worth it because it would have looked hokey with some of the other options I was cooking up. So all in all a pretty little dressing table for a whopping 15 or 20$ all things considered.

paintbrushFirst off I have to address something that was a huge struggle. The type of paintbrush. I don’t know why, maybe because this product is oil based, but you need to use a natural bristle brush. It can’t be made of anything synthetic because for some reason it reacts to the product and it will not produce the nice smooth texture we’re looking for. It just looks kinda bad.

Anything similar to the one on the left is perfect and you don’t even need an expensive one. I think I paid 3$ for the ones I was using from Wal-Mart and then threw them out after.

This is a picture of some parts sanded and the whole thing taken apart. I disconnected the mirror and the little cubicles and took out the drawers because I thought it would be easier to get everything painted nicely. That way none of the old colour would come peeking through at any point and I wouldn’t have to mess around taping stuff as much. I took off all of the hardware as well and put it in a ziplock bag so nothing got lost. (Expert tip).

I mostly just used regular sand paper to clean off the laquer type sealant that was originally on there. This is important because otherwise the Polyshades will just sit on top and it won’t be able to sink into the wood. You basically want to sand until the whole thing isn’t shiny any longer. Or at least in the areas you want to refinish.

IMG_2516


Anything that I did have to tape, I used the green painter’s stuff, as you might expect. This extra step included around the mirror and some of the edges to get them crisp. I’ll go over that little bit later but I just used little pieces and worked my way around the frame so that any smudges wouldn’t wreck the mirror.

If you DO smudge it’s okay, there’s a way to fix it that I’ll talk about when we get there.


(Below) is a before and after of sanding and removing the knobs on the little drawers so that you can get a little bit of an idea of how far you need to take the sanding job. Again, just enough that it doesn’t shine any longer, you don’t have to sand your life away until you get rid of all of the previously stained colour. As long as you pick a darker shade, the Minwax will cover the rest.

IMG_2523

Here’s just another little before and after (Left) of the cubicles that sit on the tabletop and support the mirror.


(Below) shows almost all of the parts completely sanded, aside from the mirror and drawers.


IMG_2529

You may not be able to tell very well from the photos below, but it’s also important to test the Minwax first (or really any product) in a spot that isn’t visible. This is to make sure it doesn’t react weirdly with anything that is already on there and is also handy to test what ballpark the colour will end up in. As soon as all of that prep work was done I got down to business.

This post is separated into two segments. The prep, and the painting, just so that it makes it a little easier to digest.

The link to part two is here.

Happy prepping!


I don’t have much to say for myself.

Today was a very busy day, I had so many errands to do I barely had time to think straight, my Aunt arrived on a plane this evening, so we went out for dinner and I’ve nearly run out of time for a lot of things. I certainly don’t have time to write something thought provoking.

So unfortunately, I think I’ve been slacking a little bit here…and it’s only going to get worse this weekend. Tomorrow morning, bright and early, is a big church rummage sale before we fly off on the highway to “the farm” where there is absolutely no internet so…the writing will have to wait. Maybe I’ll get some extra writing time so that I can post on Wednesday when I return but…likely not. It’s always busy on the farm, like a work-vacation.

I do have a little to show for tonight though. I painted a rock gnome and he’s very simple but pretty cute. A little kitschy but my grandma won’t mind, and it’s a gift for her so all the better. He also may be a little christmas-ey now that I look at him again…

Anyways, have a look:

Maybe I’ll find something wonderful at the rummage sale tomorrow that will totally inspire me. Who knows? Anything can happen at those things.
The thrill of the hunt beckons! And I must to bed so I am in tip top shape for it!

Sweet dreams!

Butterfly Cake Toppers

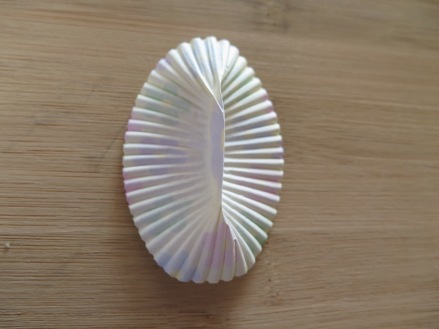
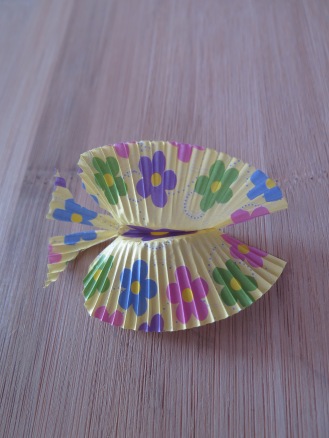
IMG_2588Today I put yet another project under my belt, here’s another sort of DIY tutorial to add to the list.

My mother wanted some little butterflies to put on the top of a cake for my Grandma’s birthday, so of course the task fell to me and my imagination. Butterflies are her favourite thing so for her surprise birthday party, it only seemed appropriate.

My mind went circling through a couple of different options, coffee filters, plain old paper, and on, but all of those options seemed a little…flat and not quite as three-dimensional as I was looking for. Then I thought of colourful little muffin cup liners. I sat down with a pair of scissors to play with some ideas for awhile, and here’s what I came up with. I thought they were too cute not to share, and they are very simple to make. They could be used for a whole lot more than just on top of a cake too, you could put them on cupcakes, or on a wreath, on the wall…who knows where.

So, all you need is scissors and muffin liners. Or sleeves, or whatever the heck you want to call them. You don’t even need tape or glue. I got a variety of colours in a multipack, but you only need one per butterfly so I wouldn’t recommend going crazy and buying a whole bunch.

IMG_2589

Here are the step by step instructions:

IMG_2590
We start with a single cup, you can even use funky designs like the one I have here.
IMG_2591
We start with a single cup, you can even use funky designs like the one I have here.
IMG_2598
We start with a single cup, you can even use funky designs like the one I have here.
IMG_2599
We start with a single cup, you can even use funky designs like the one I have here.
IMG_2595
We start with a single cup, you can even use funky designs like the one I have here.
IMG_2601
We start with a single cup, you can even use funky designs like the one I have here.
IMG_2603
We start with a single cup, you can even use funky designs like the one I have here.
IMG_2604
We start with a single cup, you can even use funky designs like the one I have here.
IMG_2605
We start with a single cup, you can even use funky designs like the one I have here.

There are a few other options that you can play with to customize how they look. I personally liked the curved and trimmed antennae the most, but you could also do straight ones (like the blue one in the picture below), or skip the trimming altogether and leave the pointed corner (like the green), or even play with the shape of the wings a little more (like the red).

IMG_2609

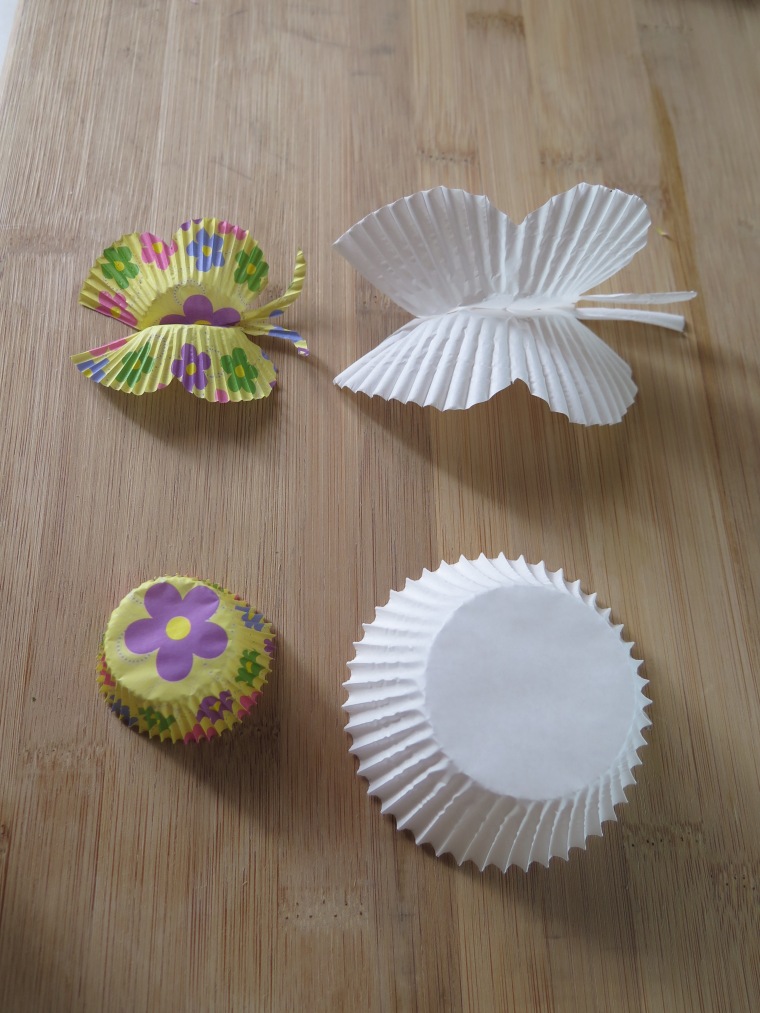
I used mini muffin cups because I thought the size would be nicer on a cake (below on the left), but the first one I made was actually in the larger size like the white one below (on the right), here you can kind of see the size comparison that you end up with.

IMG_2610

I made a whole bunch of these things in advance for the party (seeing as its supposed to be a surprise) but they are so fast that you could do it in a flash if you had a cake to decorate quickly. They just stick in the side of the cake and hover there like they’re having a snack on the icing! Very impressive with little fussing around.

IMG_2612

Painted Stereo!

This was a project and a half! I’m sorry, life ran away with me. But here it is now! And its super cool! And the pictures are super unartistic! Enjoy!

In the beginning….there was a hideously ugly old stereo. It had been covered in dust and ductape and nail polish (and other things too I’m sure). It was in a sad and sorry state.

I had gotten a little inspiration from seeing a stereo that someone had painted yellow but the link was broken so there was no tutorial or anything. I don’t know why I was so determined really, but I went in for it and blindly tried it myself. This might help give you a bit of confidence if you’re interested in doing it. It took some time, but it was worth that.

IMG_2497
Here she is in all her ugly glory. First I had to clean her up, take some nail polish remover to it and wipe it down.
IMG_2498
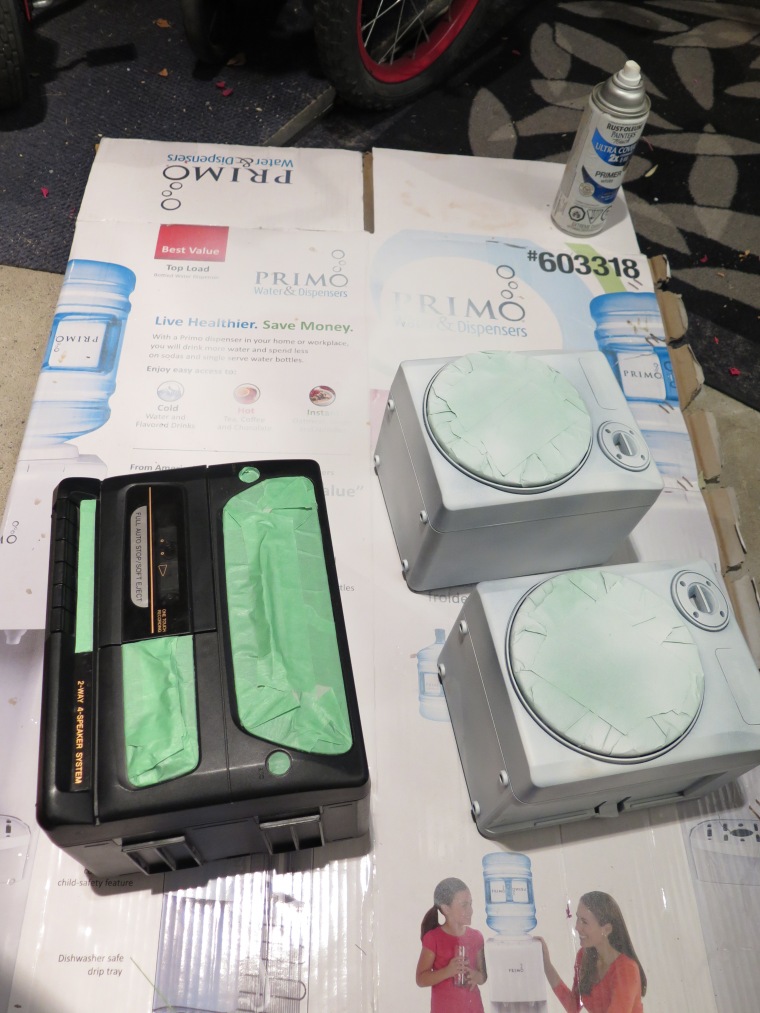
Then I pulled out the painter’s tape and taped until the cows came home. I taped up anything I thought would be important and could get damaged with the spray paint. I read on a forum somewhere that paint could damage the cones and wreck the sound so I went ahead and taped over the grills first. I may paint them a little by hand later.
IMG_2499
I even taped up the little end of the connecting wires for the speakers, as well as all of the connections in the back, the microphone, the headphone jack (yeah it has a microphone. sweet, I know). I set up a little work station in the garage with an old box. I started this project at something like 9 at night and I didn’t want to have to keep cleaning up as I waited for stuff to dry. 
IMG_2500
I primed everything first, but I started with the speakers because…I was a little scared honestly. I’m not really a spray painting expert. I guess I went with a rust oleum primer (because I had it on hand) but I would recommend using the same brand of primer and paint so that you don’t accidentally some sort of a chemical reaction if they don’t play well together.
IMG_2502
Then I accidentally sprayed the wires so I put a couple of ziplock bags around them to stop that. (Later I wiped this away with a little nail polish remover. Yes, I use that for everything)
IMG_2501
This is after I primed everything, and started spraying the speakers with the real top coat. I used that Excel Colour Vision paint simply because I already had some. It’s not really the be all and end all of spray paint, but it worked. I made sure to choose one that said it would work on plastic.
IMG_2507
This is what she looks like after I put a billion coats of paint on. It seemed like every time I moved I could see another spot I missed so you gotta be thorough. Another really important thing is not to get too greedy. Spray painting is fun, and you wanna get it done quick, but if you push too far you’ll get dribbles and drips. Ashamedly I got a few (I should have taken a picture of that but I didn’t need to broadcast that mistake to the world).
IMG_2511
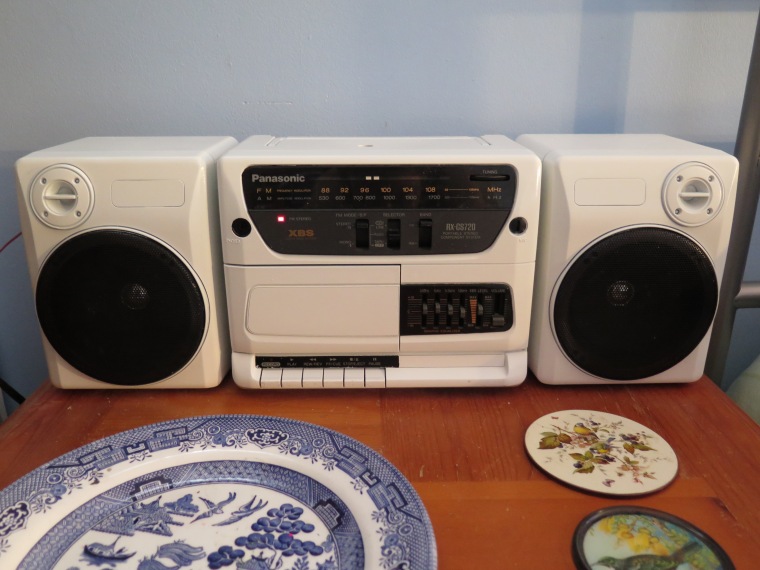
Then I ripped off the tape and behold! This part was so much fun, almost as good as pulling dried glue off of your fingertips. Don’t tell me you’ve never done that. Now I probably could have gone a little more adventurous with the colour but…I wanted it to go with anything so white was the go to. I tested the thing and everything works! The tape deck, sound is the same, radio works fine. We’re all good and ready to groove again. I think the new paint job really makes it look waay better than it was before. Super modern and trendy (with sarcasm).

Feeling Good

I’ve actually been feeling good lately. The last few days have been filled with artwork again and I don’t feel guilty about spending my time that way. I don’t know what changed. Maybe I;m just a bit happier and trying to not fixate on the badness so much. It’s too hard to constantly think about all of that.

Productivity aside though, I have been feeling a little bit of lacking in my work. I have been jumping around so much from project to project and medium to medium that I feel like I’m beginning to forget how to work on a series. I want that feeling where you make a thing over and over and push an idea to its limits. Where you are thinking about that thing kind of all day every day in the back of your mind. I miss that from college. I don’t remember how to do it though. I want that to be the next challenge I set for myself.

This is what I’ve been up to that’s been feeling so good though:

IMG_2468

This is a painting I did for one of my close friends. Her birthday is coming up and she had asked me to paint something similar to this a very long time ago. My husband called it “gorgeous” when he saw it so I guess that’s a good sign. I almost want to keep it but I think she will appreciate it way more. It is acrylic paint on plain old canvas.

IMG_2471
Here’s where that old quilting project is at right now. It took me weeeeks to decide where I should take the design next. I was a little scared of messing the whole thing up to be honest. I don’t know why, maybe because I worked so hard on the pieced panel and I really wanted it to be something I would like for a really long time. But all of that aside now, I have an idea and I’ve gotten going a little bit more again, I’m pushing forward.

Looking back at both of these projects side by side I see two very very different styles. Funny how we can switch gears so quickly and easily.

So…actually

The other day I had written a post about a project I did for my happiness psychology course (linked here)…It was really exhilarating on the day of, which sounds a little lame for what it was but nevertheless it was fun. It was different and something I normally wouldn’t do.

Anyways. So yesterday, I kept my eye out for the posters as I went through the neighbourhood on my way out to do some errands. I passed at least three of them, they were in quite visible places. And you know what I saw?

Nothing! They were all ripped down! I couldn’t believe it. They didn’t even last a day. Honestly I was a little bit sad that they were removed so quickly. And I was actually a little bit indignant too, I could feel fiery heat rising in my chest. I was surprised that at least three people clearly thought so little of them that they threw them out altogether. Is it that bad to want to put a smile on someone’s face that you have to get it out of your sight? I mean I don’t know, it was an innocent little thing and didn’t really need to be removed so soon, as far as I’m concerned. Long story short, I was pretty mad at all of that.

Something that DID cheer me up though, was working on what I love to do best. That thing is artwork and creating. One of my childhood friends asked me to do a painting or mural on her wall, and honestly, I probably should have asked her to pay me for it…but I’m a little too nice. I’ll make myself feel better by saying we haven’t given each other christmas gifts for the last two years, so here’s my substitute.

As I said, I love creating things especially for any specific reason and I really get almost completely immersed when I’m working on a project. I nearly can’t stop or take breaks once I get going (My class calls this sensation “flow” by the way). This project was kind of a challenge because the person it was for, was right there in the room with me the whole time and so there wasn’t any privacy for mess ups and restarts because I kinda felt like she was paying attention to every thing I was doing and every inch of progress. Now, three years ago, this would have really stressed me out, but I’m much more confident and comfortable with more expressionist and unplanned stuff (In the realm of artwork at least). I’m a little less rigid and more flowing when I’m working now, so I was confident that I pretty much knew what I was doing. Anything that I didn’t know, I could make up as I went. Besides, that’s half the fun.

So she wanted a very large full moon, like the one she frequently saw in australia, with a script font quote wrapping around it that says: “She was like the moon, Part of her…Was always hidden.” It’s a nice quote and I’m not surprised she would choose it because I think it fits her quite well. Maybe more than she even knows. And this thing is big, at least 4 feet across. It took me about 16 hours of work too, which is kind of a lot, but kind of not a lot. It only took two sessions.

I’ll post a few grainy work in progress pictures (which will be really bad quality so you’ve been warned) and then the final thing.

IMG_0005.JPG
So there she is, all finished. I quite like how it turned out actually. I’m (secretly) a little surprised it looks so good.


New stuff!

As I said in the last post here, I had been feeling a push to concentrate on my artwork lately. I bought this nifty air dry clay I found and it’s very cheap which is always a good find. I’m going to see how it all turns out cause…kilns are bloody expensive and I miss clay. So far it’s really similar to the traditional stuff but we’ll see how it dries.

I’m making a new bust of one of my signature little men to kind of test the waters. He’s much bigger than the usual specimens, about 6 or 7 inches tall. Anyways, here is a little gallery of some of my sketches and experiments.

The green stuff is plasticine that I use to plan stuff out with. The grey is the clay I’m working with.

IMG_2453
This is a photo of the packaging for the clay if anyone is really interested.

Sense and Sensibility

Well today i watched a movie with my husband and did some more sewing. I’ve been on this weird victorian romance kick lately. Maybe its the homebody-ness ive been having to embrace in my life. Or maybe it’s the hand quilting. Who knows, i just know i’ve been liking the dry gossippy nature of european society.

To be honest I’ve been feeling pretty crummy recently. Emotionally and physically and all of the above. A few migraines have been rearing their ugly head too. But on the bright side, I have made some good progress on the mega-throw-pillow. Last post, I had mentioned the crookedness of it all and the anal side of me came out in full force after that, so I had to rip some stuff out and re-sew the leaves to the stem. Once I got that sorted out (which took a considerable amount of time) I moved on to attaching the blossom to the stem. I think it looks pretty good at this point. I feel accomplished for my first triangle piecing extravaganza…even though it took me over 4 days to get there. Hopefully the next bit will be a bit easier on me and my poor little brain. I vow to not put any more triangles into this project.

IMG_2364

Clearly I didn’t look to closely after I took this photo. The balls of thread everywhere and my old worn moccasins really help to establish the presence of the artist in the work as well as a sense of work in progress…

Anyways, it actually resembles my original drawing which is pretty cool. I give up for the evening though and am going to sit and admire my hard work with a mug of green tea and strawberries. For anyone struggling with stress and anxiety, among it’s many other benefits, green tea is said to help relieve worry and tension. I’ve been trying to only drink that or chamomile in the evening so I’m a little less ramped up. The jury is still out whether its been working or not.

My sister thinks it’s a crocus.

So this afternoon I was puttering around and continued to work on the mega-throw-pillow. I was also fighting with my computer a little bit and at one point when I yelled eureka (thinking no one was home) my sister comes down, probably to say something cynical or sarcastic. She then sees the thistle pillow and thinks its a crocus. Which I guess is cool too…but I still say thistle.

this is what a real crocus is, we used to go out to this park in my hometown after church every sunday when spring was right around the corner and we’d hunt the grass for sprigs of crocuses. The flower is kind of symbolic to my family now so maybe it’s also fitting.

Here’s what she looks like as of right now:

IMG_2360

Either way thats what I was working on today and I actually got a little closer to having the flower panel completely finished. It’s a little bit off…and crooked… but my excuse is that it’s organic and contemporary. Yeah, I learned that in art school. The biggest part of presenting your artwork is having a clever answer to back up your mistakes. But it looks like a flower, for real! Especially if you squint a little.

IMG_2362

This is a photo of my beauty of a sewing machine. My other one is kind of kaput right now which is frustrating but whatever. This one really is a workhorse, they don’t make ’em like this anymore. No really, this one is a sort of one of a kind kenmore knockoff model which was built in Canada. The company doesn’t even print manuals for it anymore so I essentially have to figure everything out as I go. Now that I think of it, that’s kind of my general approach to sewing, so I guess its fitting. Her name is blue, and I like naming my stuff.
IMG_2363

This doesn’t have a name but my long time friend Kylie gave it to me for christmas this year and she is a very valuable person to me. I’ve known her since kindergarten which is pretty remarkable, we’ve never lost touch throughout all these years. I was drinking a big old cup of tea out of it while I worked, it just makes me smile.

I also reinstalled The Sims 3 today so…hopefully my entire life doesn’t get sucked into that. I have an addiction. But really, they say addictive personalities are partially inherited so I have the genetics.

Sayonara!